Walls and ceilings can be given the look of natural wood by either putting up planks of tongued-and-grooved softwood cladding or fixing sheets of man-made wallboard.
Tongued-and-grooved softwood is machined from planks about 12mm thick and usually 100mm wide, so that the exposed face area of each plank when erected is about 85mm. It is available with a flat or scalloped face, with or without a chamfer down the edge of the face. Plastic (uPVC) boards are also available for use both inside and out, find them at https://www.upvc-experts.co.uk/.
Man-made wallboards are usually sheets of hardboard with a plastic coating printed to simulate natural wood laminated to one face. There is a wide range of wood finishes to choose from, many of which are manufactured to simulate real tongued-and-grooved cladding. The boards are usually between 4 and 6mm thick, and are sold in sheets measuring 2440 x1220mm. More elaborate designs of wallboards are available, including imitation brick, imitation stone and imitation panelling, divided up into square shapes.
Cladding and wallboards can be bought from timber merchants and are stocked by larger d-i-y outlets, particularly superstores. When shopping for tongued-and-grooved cladding, first decide whether you want knotty or relatively clear timber. Then inspect each length to sec if it is warped or contains splits or other defects. If possible, buy lengths cut slightly longer than your floor-to-ceiling height (or the distance across your ceiling); if not, buy long lengths that will yield two usable pieces with the minimum of wastage. Then work out how many lengths are needed, dividing the exposed face width of the plank into the overall width of the wall to be covered.
Man-made boards generally cost about one-third to one-half less than a comparable area of tongued-and-grooved cladding, although the more elaborate types may be roughly comparable in price to real wood cladding, depending on the surface type. The board size is convenient, since few ceilings are over 2440mm in height, so to estimate how much is needed to cover a given area you simply measure the wall and calculate how many 1220mm wide panels will cover it.
You will need a selection of ordinary woodworking tools to cut and fit wallboards and tongucd-and-grooved cladding, plus suitable softwood battens and nails.
Fixing tongued-and-grooved cladding
Tongucd-and-grooved softwood can be fixed to the wall by nailing it to softwood battens. For vertical cladding, fix horizontal battens (rough-sawn timber 50 x 25mm is ideal) to the wall with masonry nails at ceiling level and about half-way down the wall. The skirting board can be used as a batten, or a softwood batten fixed at floor level instead. If the cladding is to be fixed horizontally, put up battens at each side of the wall and at about 900mm intervals across it.
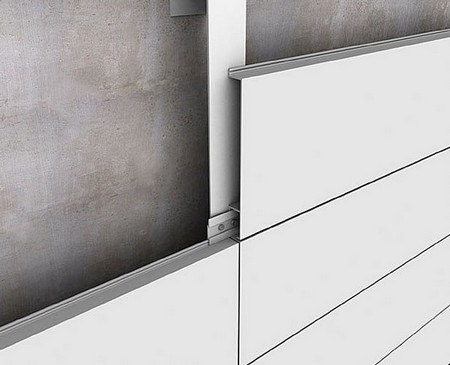
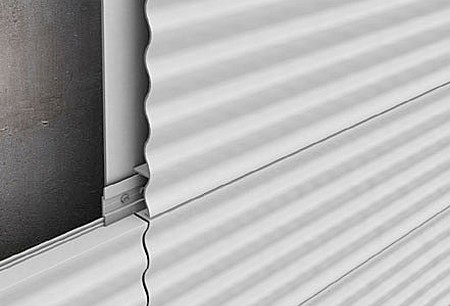
Special clips can also be used for fixing softwood cladding the method used for uPVC cladding. On partition walls, it may be possible to nail directly into the timber framework.
Fix the first length of cladding with its grooved edge against the side wall or ceiling, according to whether it is being installed vertically or horizontally. Drive nails through the board into the battens or fix clips. Butt the next length up against the first with its grooved edge over the tongue of the previous length and again nail it or clip it to the battens. Carry on fixing lengths in this way until you reach the last length; this should be cut or planed down to the required width before being pushed into place, and will have to be nailed through the face of the board since the tongue will have been removed. Attach the skirting board over the cladding, and neaten the edges of the area by pinning beading all round the edges to cover the cut ends of the boards.
In kitchens and bathrooms the battens should be spaced out from the wall and gaps left at the top and bottom of the cladding to allow a free flow of air behind it. Never use cladding on a wall which is damp without removing the cause of the dampness.
To fit cladding around light switches, follow the instructions shown in the drawings. The simplest way of dealing with flush-mounted switches and outlets is to replace them with surface-mounted ones, the face of which will be approximately flush with the surface of the cladding. Once the boards are in place they should be sanded down and scaled to protect the wood surface against dirt and to make il easy to clean. A couple of coats of polyurethane varnish is ideal.
Fixing man-made wallboards
Man-made boards can also be fixed to battens, in much the same way. Again fix horizontal battens at floor and ceiling level, and about half-way up the wall but in addition nail to the wall vertical battens to coincide with each joint between successive panels.
Man-made wallboards can also be stuck direct to the wall surface using special panel adhesives, as long as the wall surface is reasonably true and free from lumps and bumps which would make it difficult to gel a good bond. Carefully cut the boards to length, pipe the adhesive on to the back of the boards and on to the wall surface and then firmly press the boards into place. To ensure a good bond, hammer the boards over the glue lines, using a pad of cloth to protect the surface of the boards. As before, finish off the edges of the panelled areas by pinning on beading.

