When working with text and images, you have to think of type as a design element. You can create many type designs in Photoshop Elements with the [Layer]-[Type] command. There are many other ways of creating unusual text effects. In this tutorial, you will group a text layer and an image layer to get the effect of a text cut out from an image.
- Open the Image
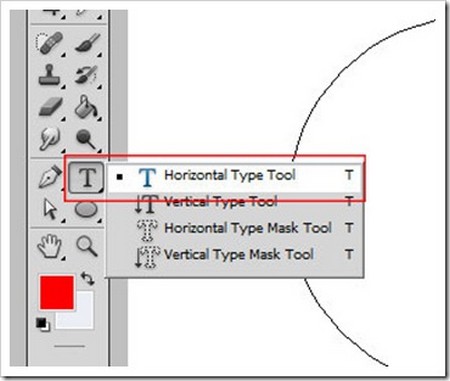
- Select the Horizontal Type Tool from the toolbox. In the options bar, set Font to Times New Roman, Size to 90 pt, and select Faux Bold.
- Type in the words Image Bank. When you are done, click the Commit Any Current Edits button in the options bar or select another tool to continue.

- In the Layers palette, you can see that a new text layer named Image Bank is automatically created.
- Right-click on the Image Bank text layer and select [Simplify Layer] change it into a normal layer.
- Select the Move Tool from the toolbox. Hold down the Alt + Shift keys and drag the text to the bottom. This creates a copy of the text on a new layer.
- The [Alt] key copies the image, while the Shift key restricts the image to vertical and horizontal movements.
- Repeat the step to make another two copies of the text. In Layers palette, you can see that the text and its copies are on four different layers.
- Click on the Indicates If Layer Is Linked box next to these layers. A link symbol will appear next to the layer to indicate that they are linked.
- Click the More button at the upper right comer of the Layers palette and select [Merge Linked] from the drop-down menu. This will combine the layers with text.
- Double-click on the Background layer in the Layers palette. In the New Layer dialog box, you can see that the default name is Layer 0. Click OK to change the Background layer into a regular layer. As a background layer has to remain right at the bottom of the layers palette, we changed it into a regular layer so that we can change its stacking order.
- Click and drag the layer with text below Layer 0. The color¬ful image is now on top of the text. Hold down the [Alt] key and click on the line between the two layers to group them together. In the Layers palette, you can see that a Grouped Layer icon has appeared beside the overlying image layer. You may also notice that the name of the underlying text layer has been underlined.
- On screen, you will see the text cut out from the image. The rest of the image is not visible. When layers are grouped, the bottommost layer or base layer defines the visible areas for the entire group.
- Select the Layer 0 from the Layers palette. Click the Create a New Layer icon. This will create a new layer above Layer 0.
- Set the foreground color to black in the toolbox. Press Alt + Delete to apply the Fill com¬mand. This will color the new layer black.
- Click and drag Layer 1 to the bottom to create a black background for the image.