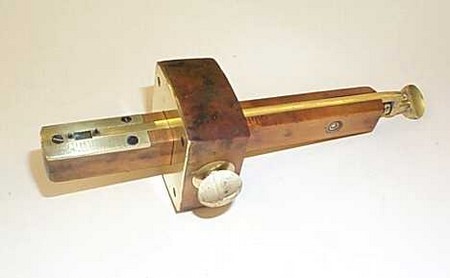
Three main types of gauge are used for marking timber – marking gauges, cutting gauges and mortise gauges. Each is used to make one or more parallel lines before cutting.
All three tools should be held and used in the same way with the stem and slock gripped in the right hand and with your thumb on the stock. Hold the slock along the face edge of the timber with the blade or pin in the stock angled in such a way so thai it follows the stock. Then cither push the pin away from you or pull il towards you. Make sure that the slock is firmly against the timber at all times. Use the gauge lightly at first and then make a firmer stroke to reproduce a more clear mark.
Marking gauge
This is the most basic of the three gauges. It has a stem with a pin set in one end and a stock which can be moved along the stem and secured by a thumbscrew.
To set the gauge, you release the thumbscrew, hold a rule against the stock and slide the stock along the stem until the required measurement is in line with the pin. Then lighten the thumbscrew carefully without moving the stock and finally check the setting with a rule and if necessary readjust.
Marking gauges are mainly used for preparing timber by marking il to uniform width and thickness. They can also be used for setting out rebates and for marking various joints.
Cutting gauge
This is similar to the marking gauge but has a cutting blade instead of a pin. It should be adjusted in exactly the same way as a marking gauge. The cutting blade can be removed and honed sharp and is usually held in place by a brass wedge. Because a cutting gauge has a blade instead of a pin, it is particularly useful for marking across boards the cut will prevent chipping when the board is subsequently sawn. A cutting gauge can also be used to cut through thin materials such as plywood, plastic and veneer.
Mortise gauge
This is used for marking out mortises and tenons for jointing. The stem has two pins one can be thought of as being similar to the pin on a marking gauge, the other is attached to a movable brass strip which in turn is attached to a screw thread and a thumbscrew. By turning the thumbscrew the pins can be moved apart. The stock of rosewood or beech is held in position by a set screw which needs a screwdriver to release and tighten it.
To set the gauge, first release the set screw on the stock. If this is not done, the brass slide will not move and the tool may be damaged. Next turn the thumbscrew and adjust the distance between the pins until it is correct. Now adjust the stock, tighten the set screw and check the measurements. Both mortises and tenons are marked with the gauge at the same setting.
