The electric or gas clothes dryer is quite a simple appliance that, in many cases, can easily be repaired by the handy homeowner. With a screwdriver, pliers, volt-ohmmeter or continuity tester, and the owner’s manual, you can probably make the most customary dryer repairs in a couple of hours over a weekend. For complicated electric dryer issues, you can contact a professional washer and dryer repair service.
DRYER BASICS
There are three groups of components: the drum, the heating system, and the controls. The drum is simply a large metal drum laid on its side with a drive belt wrapped around its circumference. This drive belt is then attached to a motor that rotates the drum. The heating system is either an electric heating element or gas burners placed so that they evenly heat the air entering the drum.
The controls include a thermostat to measure temperature or dryness, a timer, and an interlock or door switch. Keep in mind that if the door switch isn’t working properly the control system will receive no power and won’t be able to operate. This might seem like a small point, but a defective door switch is probably the most common of all dryer problems. To better understand your own dryer, refer to the owner’s manual, especially the parts drawings that show where components are located. If you don’t have your book, check with a local dealer or with a neighbor who might have a similar model. A similar drawing is a better guide than none.
TROUBLESHOOTING
Troubleshooting your clothes dryer begins at the circuit breaker or fuse box. Most electric dryers are placed on their own 220-volt circuit. Even gas dryers are often placed on a separate 110-volt circuit to ensure that the motor has sufficient current. Check the box to make sure that the breaker has not been tripped by an overload or that a fuse has not blown. Pull the fuse out of the circuit and test it with your continuity tester or VOM. Next check the electrical outlet and cord used by the dryer. Before you open your dryer to troubleshoot it, consider safety. A dryer develops heat, and uses mechanics and electricity to rotate a drum.
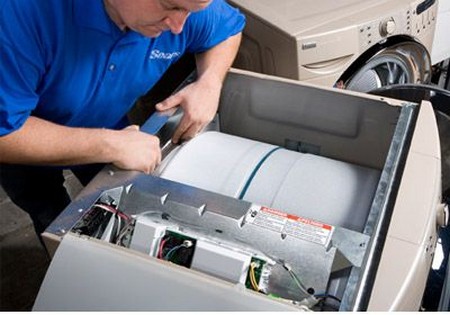
You could be burned, shocked, or pinched. So the first step to internal troubleshooting is to unplug electricity and turn off the source of gas, if any. If after this first check the dryer still doesn’t operate, check the door switch or interlock. Open the dryer door, and you will find a rod on the door that, when the door is closed, pushes in or connects to a button or latch. Check to make sure that the switch isn’t stuck with debris. To get a better look at it, you can pop the dryer top by placing a screwdriver at the front corners between the top and front, and pushing. This disengages the clips that hold the top in place and allows you to lift the front side of it.
You can then look inside the dryer to the switch to determine if a wire is loose or if something is jamming the switch. While the dryer top is up, inspect the belt that wraps around the drum. Check to see if it has obvious cracks or fraying or is broken. Using a flashlight, inspect around the drum to determine whether something has become stuck, stopping the drum from moving and tripping the motor overload. If the belt is loose, it can be adjusted with a wrench at the pulleys located near the motor. The motor is typically located below and to one side of the drum.
TROUBLSHOOTING THE TIMER
Dryer controls, primarily the timer, include numerous switches, solenoids and levers that interact to sequence your machine’s cycles as you direct. Understandably, your dryer’s timer is one of the most expensive components on your machine. With proper troubleshooting you can pinpoint the problem and, if necessary, replace the timer with minimal effort. To check the timer, pull off or unscrew the knobs, and remove the panel cover plate on front or back. The first thing to do once the timer is uncovered is to study it without moving any wires or components. The problem might be quite obvious: an unplugged connector, a frayed wire, or a loose component. While you’re studying the scene, memorize or draw out the location of all components and major plugs. If you have a detailed diagram, verify the location of the components. Then replace any plugs or wires as needed.
If this step doesn’t resolve your dryer’s problem, the next step is to remove the timer and have it tested for possible replacement. To remove the timer, mark each wire and connector you disconnect with a letter so that you can easily reinstall the unit or its replacement. Replacement timers can be found at appliance parts suppliers or through your major appliance dealer.
In some areas, the public utility districts maintain appliance parts inventories. Most of these suppliers will test your unit first. Replace your timer in the same manner as you removed it, following your owner’s manual diagrams or your own. Make a test of the dryer before you replace the final plates and backs. Thermostats aren’t checked as easily. In fact, if you suspect your dryer’s thermostat, detach it and take it with you to the appliance parts house. You can test units by immersing the element in a pan of water on the stove. Place a cooking thermometer in the water and turn on the heat. Your owner’s manual may tell you what the temperature should be. However, this method isn’t recommended with many elements since they are electrical and can short-circuit in the water. It’s better to have the appliance parts house or a repairman test your dryer’s thermostat.

